
Scroll down for a coupon code and a Giveaway!
Over the course of my sewing career I have come to terms with the fact that I basically have two different sewing modes/moods. The first is where I just want to sew something fast without too much difficulty and I don’t want to do a lot of prep. In this mode there are no muslins. There’s usually no pre-washing, no dress form, no thread changes. When I sew like this I just want to zone out. I pick a pattern that looks easy or something I’ve made a few times before, pop in my headphones and I roll with it. Fast and Loose. I just cut and sew and hope for the best. Most of the time it works out. Sometimes it doesn’t. Its all part of the Fast & Lose game.
My second sewing mood is the polar opposite of Fast and Loose. In this mode I spend hours obsessing over every possible permutation of the pattern that I can think of. I pour over the hashtag. I scour Pinterest for similar RTW garments for ideas. I weigh all the fabric options that might work for the pattern? “If I use that will it need a lining?…How will it drape?…What hacks would be interesting?…What details can I add to make it special?” I will spend a bazillion hours on the internet looking for the perfect trim. I might make as many as three (or more if I have to) muslins. I lose sleep. It can get pretty intense sometimes when I’m deep into that space. Especially if things aren’t going smoothly. I call it attention to detail. My family calls it obsessive. What can I say? When the muse speaks I must listen to her or she won’t quit pestering me.
Every once in awhile you see a pattern and right away you start hearing the distant ghost-like voice of your muse. It begins as a whisper then slowly the gap between you and the voice closes until it feels like someone is talking into your ear demanding your attention. I loved the Farrah immediately. The design is on-trend with so many possiblities. Variations add value to a pattern for obvious reasons. They always factor in when I decide which patterns to spend my time with. I feel like I get so much more return on my time-investment when learning one pattern means I will be able to make many different-looking garments. This is especially true if the pattern requires a lot of prep work like muslins and fittings.
So as you can probably guess this Farrah was a result of the aforementioned sewing mode number 2, AKA Obsessive Mode. The truth is I went into the project with plans to make View A dress. I started on my muslin and as I dove deeper my plan naturally morphed into something different. Before I even started working on the muslin my aim for this project was to make it in a way I hadn’t seen done before. My hope was that I could provide a new perspective on what could be done with the pattern. One of my favorite things about sewing is having the liberty to take a pattern and really find my own expression through it. Sewing patterns are a springboard. A foundation in which we have the privilege of using the creative work of others to build and express our own creative spirit. It is a remarkable collaboration that creates special bonds in our little community. We are all woven together in our creative endeavors this way.
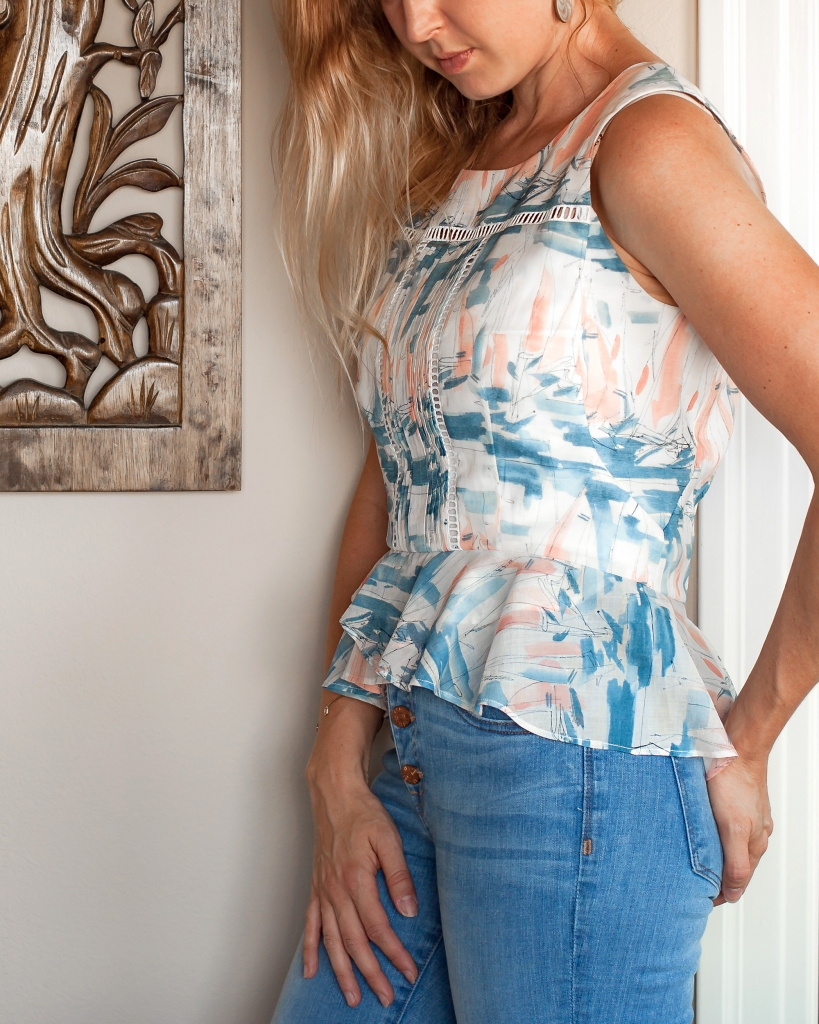
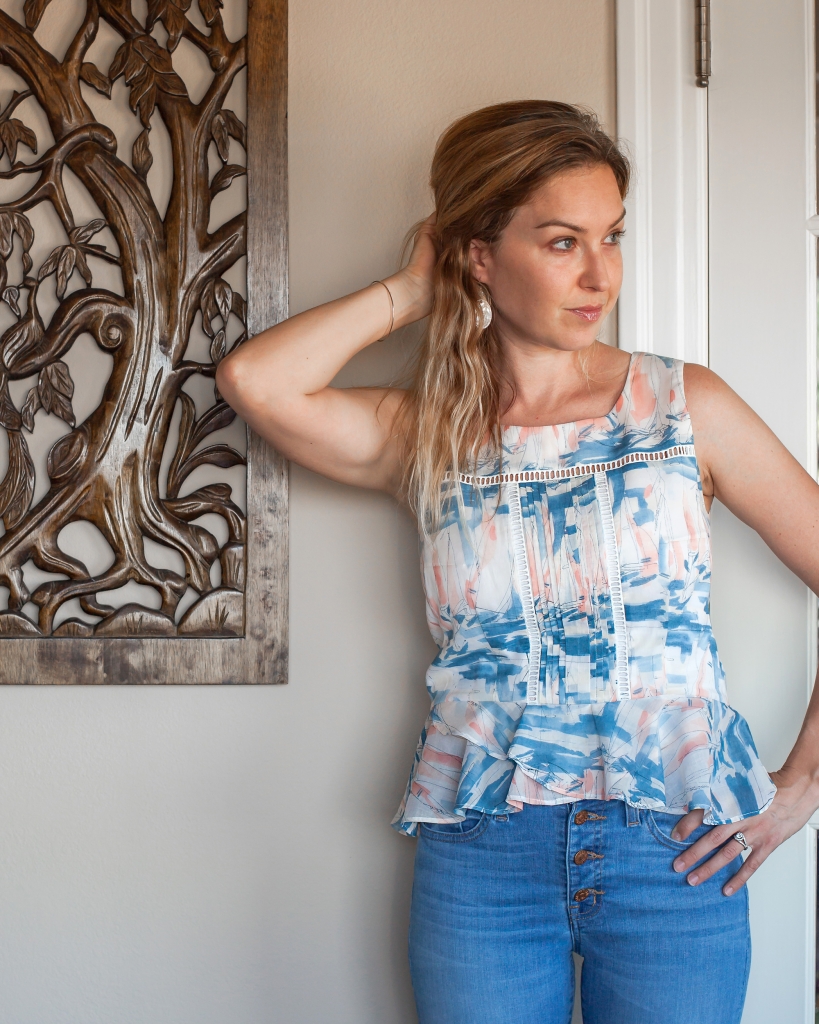
I found the Farrah pattern to be one of the best and most thorough I have worked with. Gabriela of Chalk and Notch has superb pattern writing skills. The instructions were clear, well laid out, logical, and concise. The illustrations are some of the best I’ve seen in the Indie pattern sphere. All the pattern pieces fit together perfectly without issue. I found the FBA instructions to be extremely helpful. The truth is I made two Farrahs in preparation for this blog tour. My first, which I have decided to save for a future blog post, taught me the value of careful measurements. That first run through with the pattern, although wearable, ended up a bit snug in the bust. After that first attempt I dove into muslin-making tailspin. I wasn’t about to risk the my garment not turning out if I was cutting into this precious sailboat fabric. I emerged from my sewing cave about a day later armed with pattern hacks and a solid plan for Farrah number two. It was a three pronged deviation from my first attempt. I decided darts, details, and a peplum would be the defining features of my new course of action. I was ready to rock and roll. I also concluded that my final garment would have to be lined to combat the sheerness of this gorgeous chiffon voile from Miss Matatabi. I absolutely adore this sailboat print. (get it HERE)

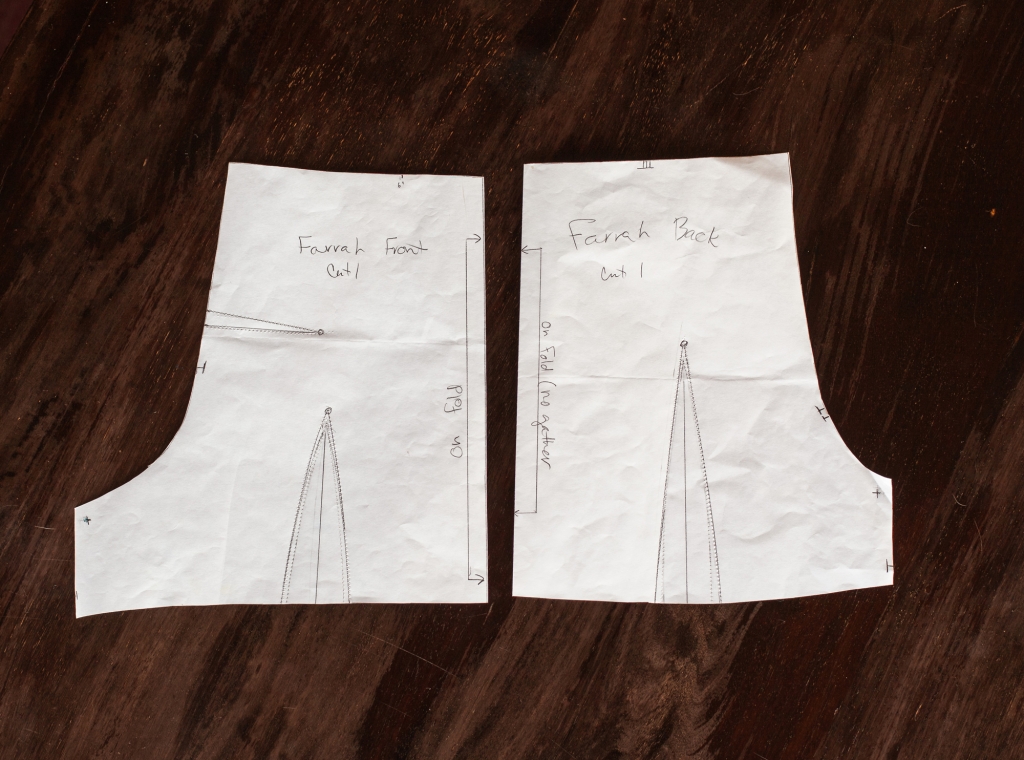
The first change I started with was an FBA for a little more room in the bust. Instructions for the FBA were clearly outlined and easy to follow in the pattern instructions. I also wanted this Farrah to have a bit more contour so I added waist darts in the front and back and eliminated the gathers at the center back below the yoke. I made darts as fitted as I could while still being able to slip the garment on over my head and bust with relative ease. After that I shortened the bodice a significant amount so the peplum would fall from the natural waistline. You can see the redrafted bodice pattern pieces below. I thought it was funny the godet feature of the pattern made this top pattern look like it should be a pair of shorts.
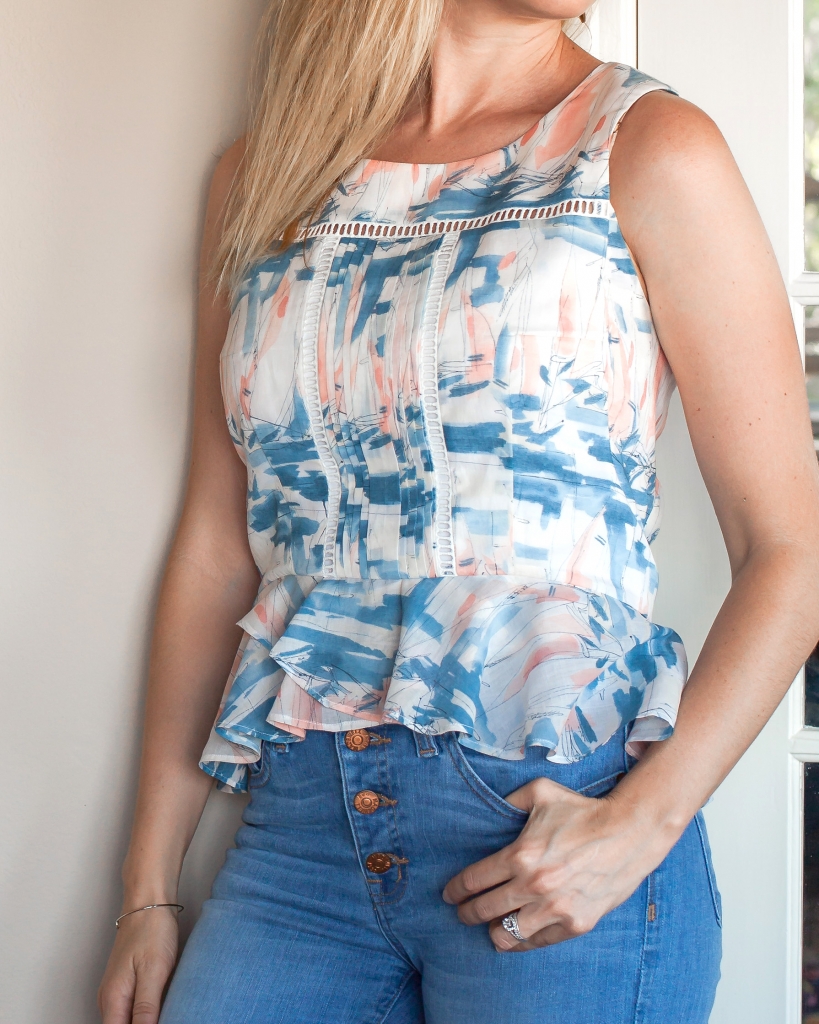
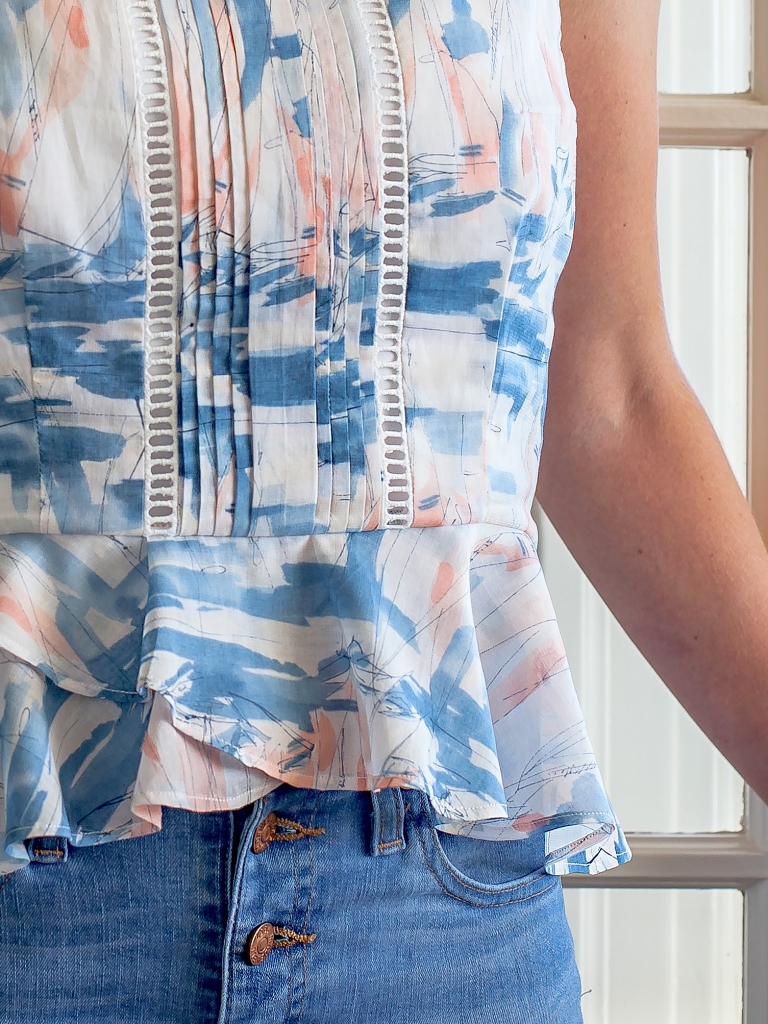
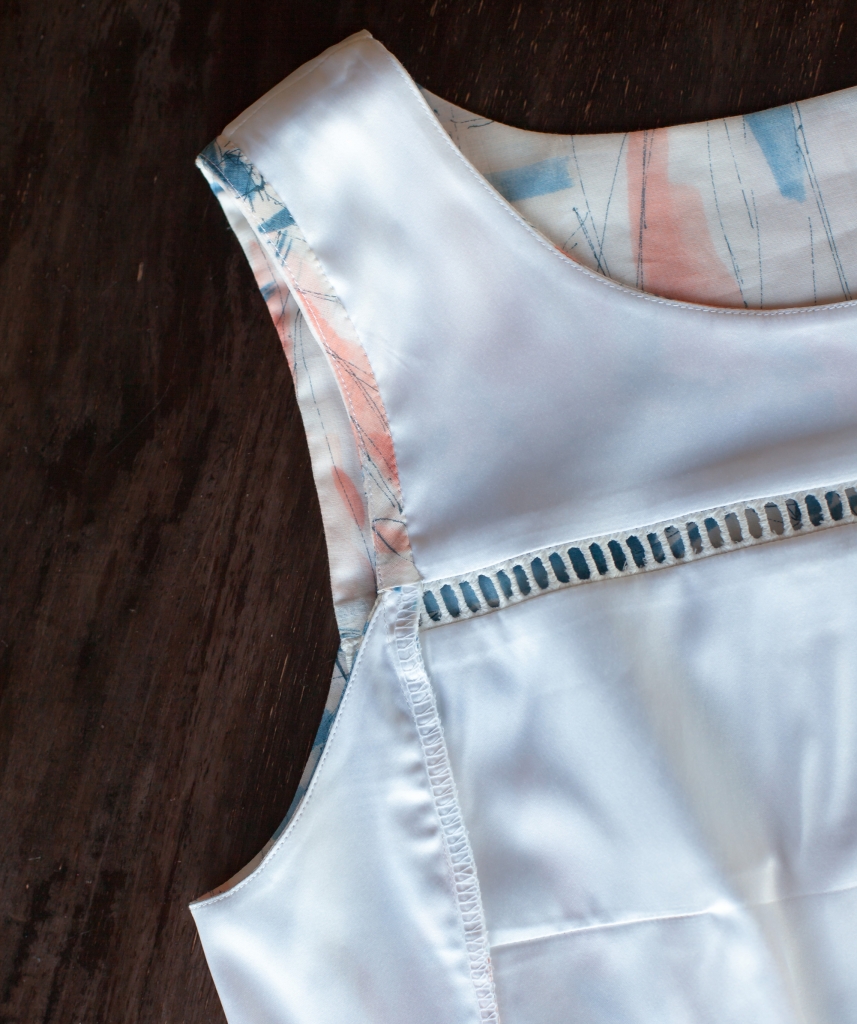
Without a doubt it is the details of a garment that always pull me in. Learning how to add key details to my garments is something I really want to focus on going forward in my handmade wardrobe journey. For this project I settled on pin tucks to add a bit of interest to the bodice and my favorite type of insertion lace. I love the way it turned out. I want to add insertion lace to ALL THE THINGS. If you’re looking for this type of trim you can find it multiple places. It goes by various names including insertion lace, faggoting, and ladder lace. I have had success with all three of those search terms while shopping for it. I have also spotted it at Joann but not in the white you see here. I found the trim in this garment at Joyce Trimming on Etsy. I used the 1.5″ size and I did not make any adjustments to the pattern pieces at the yoke or top of the bodice to accommodate the trim.
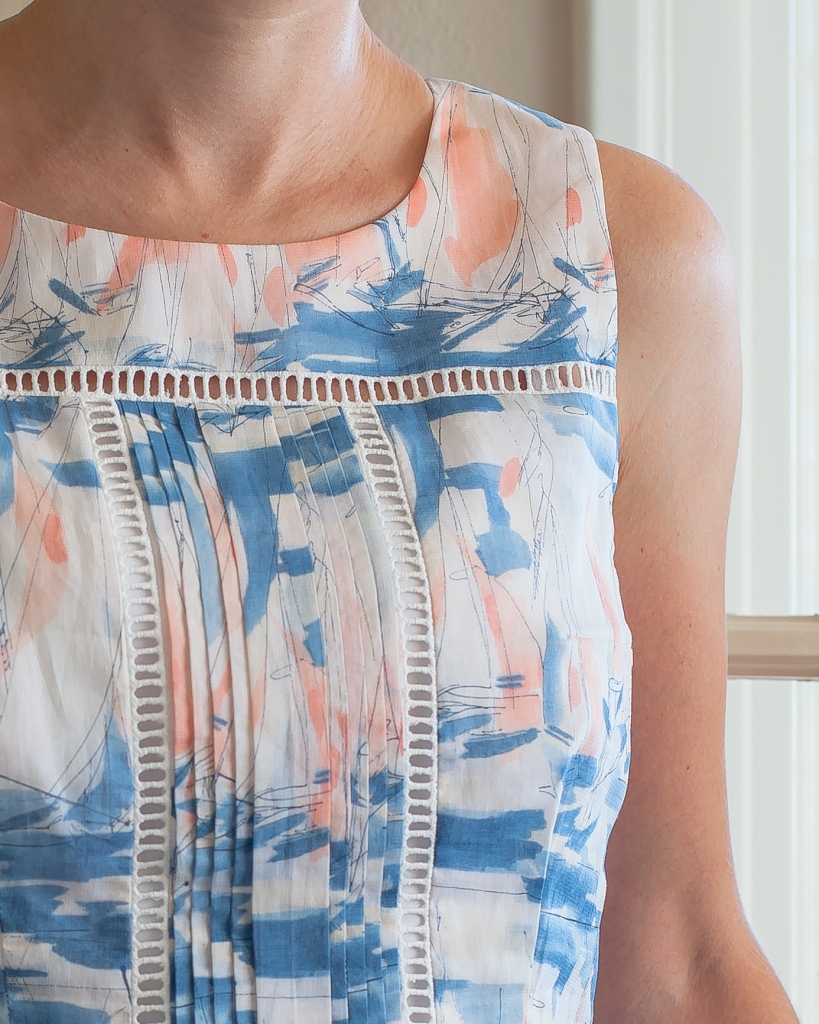
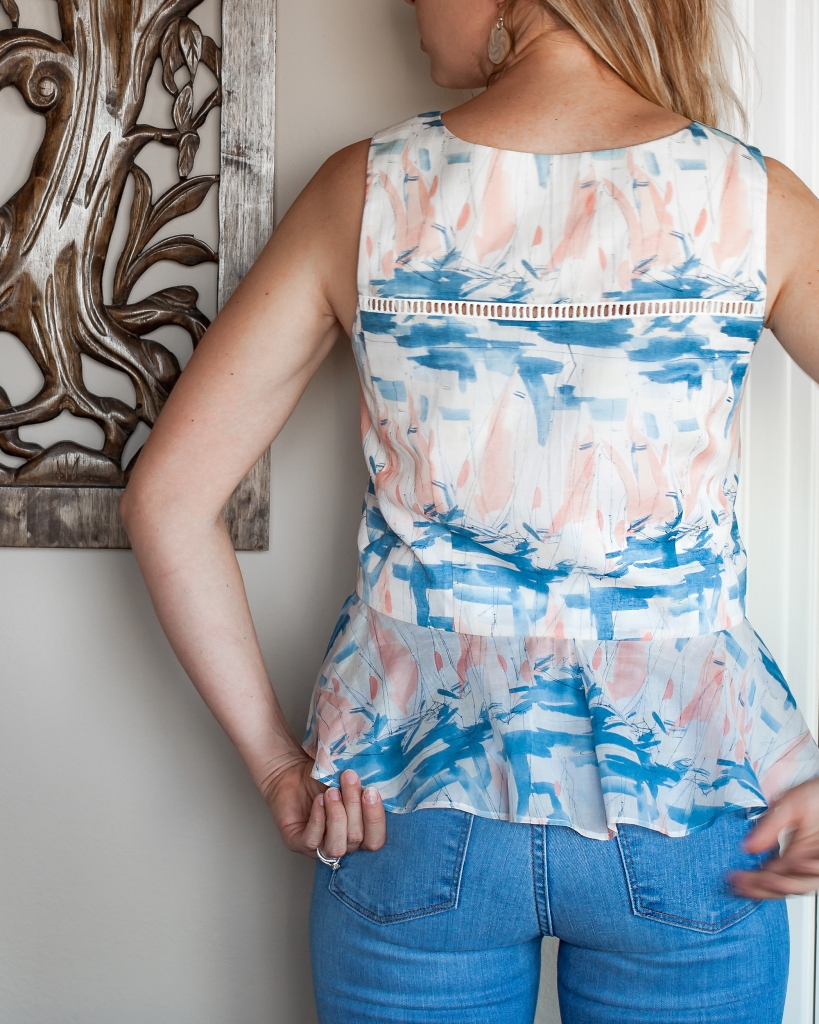
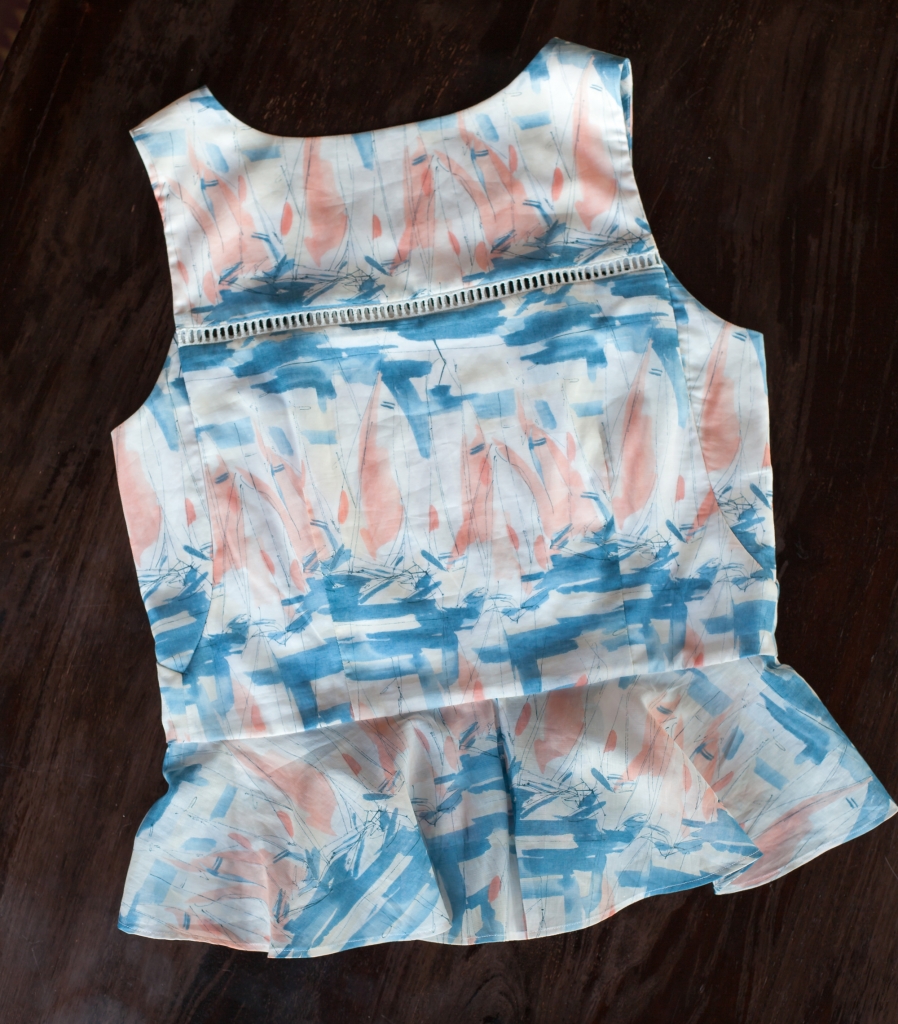
I lined the yoke and bodice portion separately because I wanted that bit of skin to peek through the upper portion of the trim while still providing modesty. This fabric was very sheer. I suspected I might have to make accommodations for sheerness when I ordered this fabric but the little sailboats had grabbed hold of me and I couldn’t resist them. I took the scary chiffon leap and told myself I would cross that bridge when I came to it. I am so pleased with how the inside of this garment turned out. It worked out perfectly that the godet detail happens to be the last piece to go in. It provided an opening for me to get to the peplum seam with a super clean finish that naturally falls in a flattering way. The lining also made it possible to omit the bias binding at the underarms. I opted for a clean turned edge finish under the arm and used the bias binding only for the upper part of the arm opening.
![]()
![]()
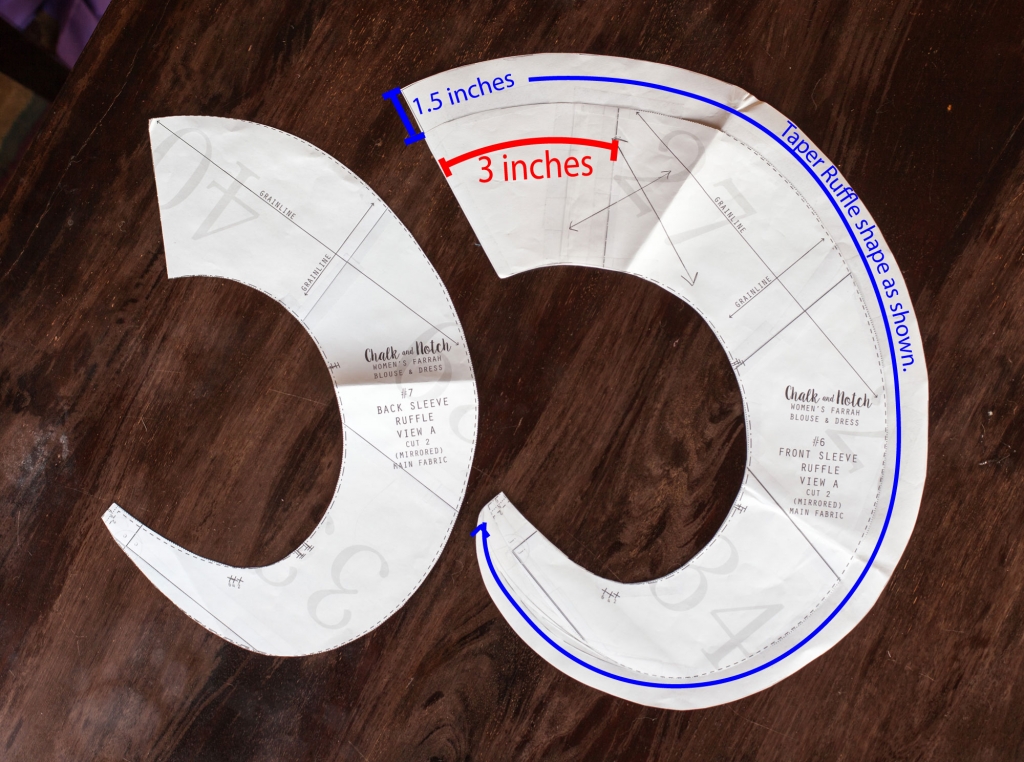
The final touch and surprise ending to this make was the switcheroo of moving that ruffle sleeve to the waistline for a whole new look. I made 3 minor changes to the ruffle pattern piece which you can see by comparison in the photo below. The one on the left is unchanged, the one on the right is for the peplum. I added 3 inches length to the the ruffle to ensure it would overlap enough in the front to meet my modesty standards. when doing this I made sure to continue the natural curve already provided by the pattern piece so that the ruffle would undulate properly. I also added about 1.5 inches to the width at center back and tapered it from there to its original length at the other end. I still cut 2 mirror and what was the top of the shoulder now gets aligned with center back of the bodice. I love how simply overlapping the tails of the ruffle in front allowed me to avoid precise measurements at the waistline in addition to adding a lovely detail.
I absolutely love this pattern and I am still itching to make a go at some of the other ideas I had while I was in the “research” phase of the is project.
If you too are itching to get your hands on this pattern Click here for 15% off your purchase with coupon code “jenn” at checkout!
Don’t miss out on all the other fantastic creations in the tour. You can follow along here:
- June 19 Helen’s Closet
- June 20 The Sewing Rabbit
- June 21 That’s me. You are HERE
- June 22 Groovy Baby & Mama
- June 23 The Sara Project
Miss Matatabi has been so generous to all of us on this tour by providing all fabrics used but it doesn’t stop there. Click HERE for your chance to win a $50 Gift Certificate to the shop!

Please note: This post contains affiliate links. These links do not result in the reader paying any more for the products shown but do allow for bloggers such as myself to make a small percentage on purchases resulting from this post. Its what keeps the blogging world a’spinning round let’s to continue doing what we love to do. All opinions stated here are my own and reflect my honest feelings about said products and shops. The Farrah sewing pattern was provided to me by Chalk and Notch. The fashion fabric used to make the garment was provided by Miss Matatabi.
Thanks for reading!
Muah! XOXO
SaveSav
WOW! I’m a 25 years quilter, but my niece is starting to sew clothes, she can practice on me, I love this! Yes, I sent her the IG link, gentle hint!!
Thats awesome Carol! Thanks!
I wanted to wait until my kids were quietly watching a movie so I could sit down and read your post! Your Farrah is bananas – truly amazing!! I can not thank you enough for the time and energy that you poured into making your Farrah. It’s exactly what I love about being a pattern designer, sending patterns out to our community and seeing the gorgeous creations that come to life. It’s so thrilling and it never gets old. It was such a pleasure to work with you and you are a true creative talent! Sending you huge thanks! XO
Thanks Gabriela. You totally made my day. I truly loved every second of working on this. Even the troubleshooting of round one. Thanks for all your help and suggestions for improving the fit. This was a fantastic experience.
Wow that looks so beautiful! Can I ask how much ease you have? I’d love to make something that fitted without closures!
Hilde it is a bit snug to pull over the bust when I put it on but I just slip it on carefully and I don’t think it will be an issue. When the garment is on I have about 2-3″ in the bust and waist. Something I didn’t mention in the text is that all the seams are finished with a serger including the ones you don’t see inside the lining. I did that so I wouldn’t have to worry about popping a seam when I pull it on and off. It gives the seam a bit of stretch. It is unlikely you would ever see a garment like this without an opening in a store because with people trying on and not being careful it would probably be ruined before it ever got purchased. Since I am the only one that will ever be trying this on and I will treat it gently, going with the very least amount of ease I could get away with worked for me.
Thank you for your detailed reply!
I’ll try a toile to see how much ease I need
Wow this is a masterpiece. The attention to detail is unbelievable both on the inside and out. I’m totally in awe of it!!!
Thank you so much That!
This looks amazing! I rarely see heirloom sewing done in an inspiring way for women!
Thank you so much! Such a compliment.